 myAcademy® Rewards Credit Card
Road Bike Size Guide: Know Your Size for Road Biking

Ready to hit the asphalt on the perfect road bike? The right-fitting road bike is essential for a comfortable ride.
Our complete guide will help you understand what it takes to find yours! We'll walk you through the process of finding a road bike that fits your stature from head to toe. Grab your helmet, and get ready to hit the road in comfort.
Key Takeaways
- Discover our detailed road bike size chart that uses your height and inseam length to determine what bike size and frame size you need.
- Uncover what size road bike you need by ensuring that you can touch the ground with your tippy toes, maintain stability in your lower back while pedaling, and have sufficient clearance between the top tube and your groin.
- Learn what measurements you need to find your perfect fit, including reach, ape index (wingspan), saddle height, and more!
Road Bike Size Chart
Match your height and inseam to the recommended size in our road bike size chart. Be sure to check the manufacturer's website for more sizing information. Keep in mind that most bike specs will be listed in centimeters.
| Road Bike Size Chart | |||||
|---|---|---|---|---|---|
| Rider's Height |
Rider's Height (cm) |
Frame Size (cm) |
Frame Size (in) |
Bike Size |
Inseam Length (in) |
| 4'10" - 5'0" | 147 - 152 | 47 - 48 | 18.5 - 19 | XXS | 24 - 26 |
| 5'0" - 5'3" | 152 - 160 | 49 - 50 | 19 - 19.5 | XS | 26 - 28 |
| 5'3" - 5'6" | 160 - 168 | 51 - 53 | 20 - 21 | S | 27 - 29 |
| 5'6" - 5'9" | 168 - 175 | 54 - 55 | 21 - 22 | M | 28 - 30 |
| 5'9" - 6'0" | 175 - 183 | 56 - 58 | 22 - 23 | L | 29 - 31 |
| 6'0" - 6'3" | 183 - 191 | 58 - 60 | 23 - 24 | XL | 30 - 32 |
| 6'3" - 6'6" | 191 - 198 | 61 - 63 | 24 - 25 | XXL | 32 - 34 |
| 6'6" or taller | 198 & up | 64+ | 25+ | XXL+ | 35+ |
What Size Road Bike Do I Need?
Your road bike size depends on your height and inseam. Make sure you can touch the ground with your toes when seated and that your back remains stable when pedaling.
There should be space between the bike's top tube and your groin. Test ride the bike for comfort, and use additional measurements if unsure.
What Measurements Do I Need for Road Bike Size?
Before purchasing your road bike, make sure you have the most accurate measurements. Having these means you won't strain your legs to reach the pedals, hunch your back too much, or overstretch your arms. Additionally, you also adequately align your hips.
- Height — Measuring your height helps you to determine what size road bike frame you need when you use a road bike size chart or take other measurements (like your ape index).
- Inseam — Your inseam plays a key role when determining your standover height, which we'll cover later on.
- Torso — Knowing your torso length can ensure you choose a bike where you won't be cramped or hunched over when riding.
- Arm Length — To achieve a comfortable riding position on a road bike, you shouldn't overextend your arms.
- Reach — The road bike reach is the distance between the saddle and the handlebars. This affects how close or far away you'll feel from the handlebars.
- Ape Index (Wingspan) — The ape index is simply the length of your arm span subtracted by your height.
- Standover Height — You should have a few inches of space between the top tube and your groin when you're standing in front of the road bike's saddle.
- Saddle Height — Adjusting your saddle height will help you find the most comfortable pedaling position.

Measure Your Height
- Grab Supplies — You'll need a ruler, a retractable tape measure, and a sticky note (if you're by yourself).
- Get Into Position — Remove your shoes and stand with your back against the wall (hip-width apart).
- Measure Your Height — Lay a ruler flat against the top of your head. Ask a friend to measure from the ground to the top of the ruler.
- Measure Your Height Alone — If you're by yourself, mark the spot on the wall where your head reaches with a pencil and measure from the ground to that mark.

Measure Your Inseam
- Grab Supplies — You'll need a book or ruler, a retractable tape measure, and a sticky note (if you're by yourself).
- Get Into Position — Remove your sneakers and stand shoulder width apart with your black flush against the wall.
- Measure Your Inseam — Tuck the ruler or book against your groin and measure from the ground to the top of the book or ruler.

Expert Tip:
If you're by yourself, you can use the ruler to measure a point against the wall and place a sticky note there. Simply measure from the ground to the top of the sticky note.
Measure Your Torso
- Grab Supplies — You need a soft measuring tape handy. You can also jot down your measurements on a piece of paper or save them on your phone.
- Get Into Position — Stand up straight with your feet slightly less than shoulder width apart. Don't round your back.
- Measure Your Torso — Taking the soft measuring tape, measure from your groin to the base of your neck, right above your sternum. This is easier to do with a friend or looking in the mirror to make sure you don't slouch.

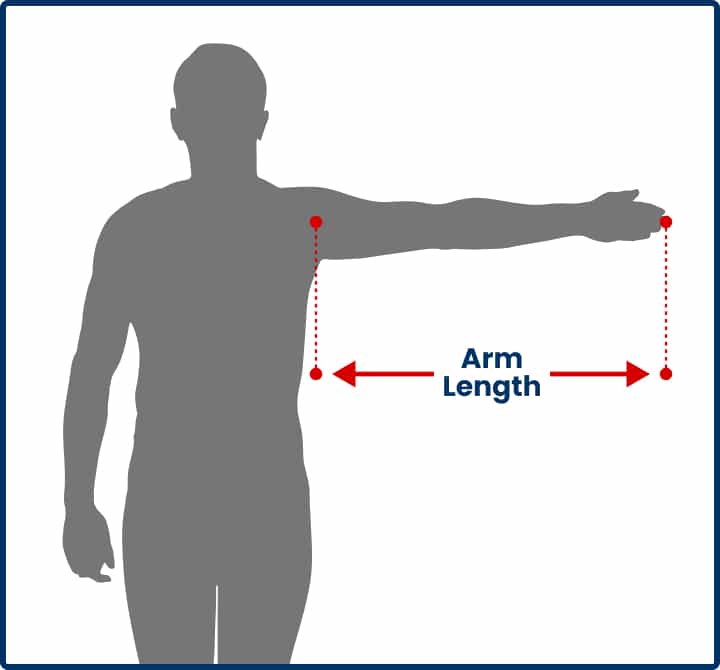
Measure Your Arm Length
- Grab Supplies — Have a soft measuring tape run the length of your hand. This measurement is much easier to do with a friend.
- Get Into Position — Stand tall, and extend your arm out parallel to the ground.
- Measure Your Inseam — Measure from your collarbone to the middle of your palm.
Measure Your Reach
- Sit in the Seat — You'll want to sit in the seat and quickly glance down at the handlebars. You shouldn't be able to see the front axle (the rod that allows your bike's front tire to spin) of the bike when you look down.
- Locate the Front Axle Positioning — If the front axle is in front of the handlebars, this means the reach is too short for you. If the front axle is behind the handlebars, this means the reach is too long for you.
Measure Your Ape Index (Wingspan Measurement)
- Grab Supplies — Have a soft measuring tape on hand and ask a friend for help measuring.
- Get Into Position — Stand tall with your back against the wall and extend your arms out parallel to the ground.
- Measure/Calculate Your Wingspan — Have a friend measure from one side to the other. Then, take the length of your arm span and subtract your height.
- Choose Your Bike Frame Size — If the number is positive, choose the larger frame size if you're in-between sizes. If the number is negative, choose the smaller frame size.

Measure Your Standover Height
If you're shopping for a bike in-store, the store associate will likely raise the saddle height to hip level for a good starting point. Follow these other guidelines for standover height:
- If you have too large of a gap, then you'll want to choose a bigger bike.
- To find your optimal standover height for your road bike, measure your inseam and then subtract two inches from it.
Measure Your Saddle Height
- Stand next to your bike. Level your bike saddle/seat so that it matches your hip.
- Mount the road bike saddle. Sitting on the seat, straighten your leg so that the foot pedal's crank arm is down (or parallel to the top tube of your bike's frame).
- Position your heel on the road bike pedal. Center your heel on the middle of the pedal.
- Extend your leg. When you extend your leg, you should not feel any pain, discomfort, or pressure while doing so. If you do, adjust the saddle and repeat these steps.

Saddle Height Tips for Road Bikes
- Tippy Toes: Your tippy toes should be able to touch the floor. You shouldn't be able to rest the bottom of your feet on the ground.
- Lower Back: Make sure your lower back isn't swaying back and forth during your test ride. If it is, then you should lower the saddle a few inches.
- Knee Angle: While your foot is on the pedal, you should have between a 23-30 degree angle in your knee.
- Knee and Foot Alignment: Ensure your knee and foot are in line by hanging a string down from behind your kneecap to below the pedal. The ball of your foot should land directly over the pedal axle. If it doesn't, you may need to adjust the saddle.
Have Fun Out There!
Ready to embrace adventure on your new road bike? With warm weather on the horizon, there's no better feeling than riding your bike on a shaded forest trail, on a boardwalk by the beach, or on a paved path at your local park!
From leisurely rides to all-day fun, you get to take your bike for a spin whenever you want. Explore the great outdoors with confidence and style on your trusted road bike.