 myAcademy® Rewards Credit Card
How to Sight a Rifle: A Step by Step Guide
A scope is a type of sight that mounts onto a firearm and brings the target into view, helping gun owners shoot with a greater level of accuracy. For hunters, this increases the chances of achieving an ethical kill, whether they’re targeting waterfowl or big game.
Sport shooters use riflescopes to help them hit their targets’ bull’s-eye consistently, minimizing the chances of human error. At Academy Sports + Outdoors, we’ll teach you how to sight in a rifle scope and discuss some of the things you should keep in mind along the way.
Key Takeaways
Steps to Sighting a Rifle
Sighting a rifle involves a little trial and error, but taking the time to do so is crucial to hitting moving game in the field and stationary targets at the shooting range. Once your optic is secure and zeroed in, you’re ready to take action. The steps to sighting a rifle include:
Step 1: Install the Scope Properly
The first thing you want to do is firmly mount the scope to your rifle. Many rifles come equipped with a mounting system, which helps streamline this process. Mounting systems feature pre-drilled and tapped holes for the base of your optic, while others may have a grooved rail system, such as a Picatinny rail.
While installing your scope, make sure the rings are evenly tightened and meet the recommended specifications. You'll avoid damaging your scope tube or risking it moving during heavy recoil.
Step 2: Start At a Distance of 25 - 50 yds
Establish your setup approximately 25 to 50 yds away from your target, ensuring you have an unobstructed view. This is a solid distance for testing your scope’s accuracy and making preliminary alignment adjustments. Once your rifle is sighted, you can venture out further.
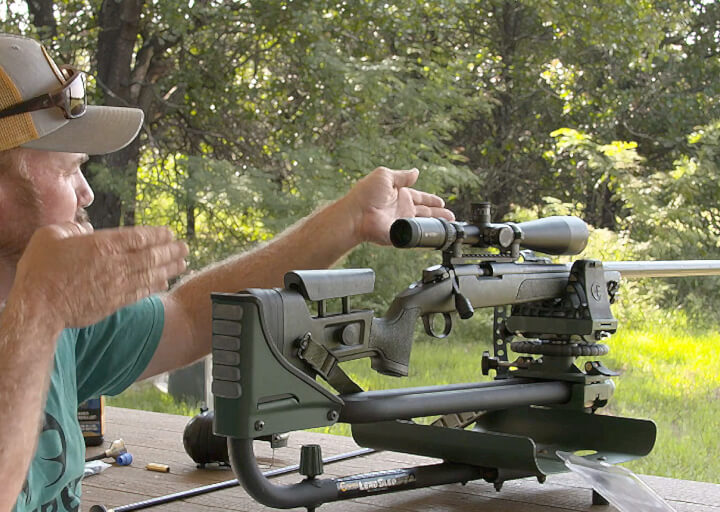
Step 3: Stabilize Your Rifle
While you may prefer to hold your firearm in the field, it’s best to mount it in a vise or place it on a shooting rest while sighting to prevent movement. It is also important to begin this process with your firearm unloaded. An easy-to-find hunting accessory, a shooting rest will keep your firearm level as you adjust your optic. Many rifle mounts specifically designed for scope sighting are available, as well.
Once your firearm is secured, the next step is to visually match the position of the center of the bore with the center of the optic. When your firearm is in place, position yourself behind it wearing the proper protective gear.
Step 4: Bore Sighting
Bore sighting is the step that ensures your optic is in alignment with your firearm’s barrel. Some shooters do this manually, while others prefer to use a laser. The laser dot either inserts into the chamber or attaches to the muzzle.
Once your firearm is stabilized as described in Step 3, the next step is to visually match the position of the center of the bore with the center of the optic.
For this, you will need a target placed approximately 25 yards downrange from your secured firearm. If you can easily see the center of the target when you sight through the barrel from behind the rifle, you are in the money. Now you will position the firearm so that the target’s center is near as possible to the middle of the bore.
Be careful not to shift the firearm at all, adjust your optic until the reticle is focused on the middle of the target. This can mean loosening the screws or hex nuts on your scope rings just a bit or twisting the scope to ensure you set the crosshairs, reticle or other marks at the horizontal and vertical guidelines.
Check at this point to determine whether your scope’s marks are not on the center of the target, although correctly affixed at the horizontal and vertical positions. In this case, you will need to move the crosshairs/reticles using the scope’s external turret adjustments.
You will know if you were successful in aligning the scope properly if you can drop down behind the gun to sight through the barrel and see the target in the center. If you cannot see the target at the center, re-center the target with the firearm’s bore by sighting the target through the barrel, then moving up and looking through the optic and adjusting as necessary.
Moving between barrel and optic and tweaking it as you go will lead to having both your barrel and your optic centered on the target and your bore sighting process complete. At this step, make sure to tighten any loose screws on your scope rings.
Once you have bore-sighted at 25 yards, you will be on paper for shooting live ammo at 100 yards.
Step 5: Fire a Few Rounds
After you’re finished bore sighting your rifle, take a few shots and see where they hit. Firing in 3-shot groups will give you a good idea of where your bullets are generally landing. Keep in mind that bore sighting is more of a rough adjustment, and the goal is just to get on the paper. Precision targeting toward that central red dot comes next.
Step 6: Make Adjustments
Once you’re able to hit your target, zero in your sight as needed to ensure your projectiles hit the bull’s-eye. This may include a series of adjustments to your sight, accounting for environmental factors and other external ballistics (things that affect the flight pattern of a projectile).
Additional Steps to Sighting a Rifle
While you’re sighting in your optic, there are several other things to consider, including:
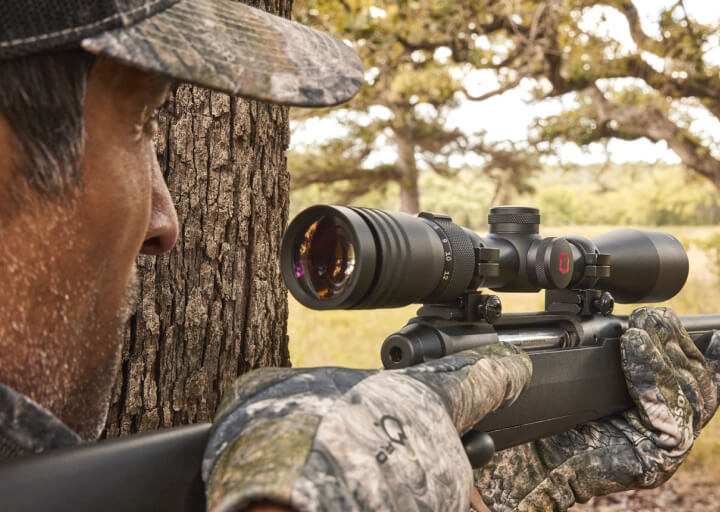
- Eyepiece: Adjust your eyepiece so that you see a crisp, clear image of the target. Also, be sure to check the eye relief – this should be set correctly to ensure your scope won’t impact you on recoil.
- Minute of angle (MOA): This value correlates to the minute hand on a 360° clock, with each minute referring to 1/60 of a degree for precision targeting. Most riflescopes let you adjust the crosshairs in ¼ MOA increments or ¼ inch at 100 yards.
- Elevation adjustment: This turret adjusts the direction of impact up or down.
- Windage adjustment: This turret adjusts the direction of impact left or right.
- Reticle alignment: Be sure the crosshairs of your scope are aligned to the elevation direction and windage adjustments. This is especially important while shooting at a distance of 250 yds or more.
Expert Tip:
Use the sky to help focus your reticle. Focusing is easier when you have a solid background – like the sky – to work with. Simply aim the scope upward, look away at something else in your surroundings, and then quickly look back through the scope. If the reticle is blurry, adjust the diopter and try again.
How to Sight In a Rifle Without a Scope
If you don’t have a scope, that doesn’t mean you can’t hit your target accurately. And many hunters and marksmen prefer using firearms without scopes, simply relying on their factory-mounted or accessory sights. Common gun sights include:
- Open sights: Also called iron sights, these are configured with a single component at the front end of the barrel and two components at the rear with a gap in between. To aim, simply align the front post with the notch of the rear sight.
- Peep sights: These are similar to open sights, but the rear component is crafted with a lens for the shooter to look through. To aim, look through the peephole to line up the target with the front sight.
- Holographic sights: Built for fast target acquisition, these sights use technology that makes your eyes think the target is closer than it really is.
- Reflex sights: Ideal for short- and middle-range targets, these sights typically have a red dot in the center for aiming. Some also have brightness settings or attachments for daytime and nighttime use.
- Fiber-optic sights: Available in green, red, orange and yellow, fiber-optic rifle sights work well in low-light settings.
- Laser sights: Aligned with the barrel, these sights project a small beam of light onto the target. Red lasers are recommended for nighttime use, while green lasers are ideal for daytime shooting.
Expert Tip:
It’s always a good idea to have a backup. You may heavily depend on your scope for precision targeting, but what happens if it runs out of power or malfunctions in the field? Having a sight on hand – and knowing how to use it – can be a true asset.
What to Avoid When Sighting your Rifle
Learning how to sight a scope on a rifle the right way is the key to precise targeting. Now that we’ve gone over what to do, let’s discuss some of the things you’ll want to avoid:
- Starting at a longer range: While you can start at 100 yds, it’s better to begin at a shorter distance. Initially positioning yourself at 25 yds can help save valuable time and ammunition.
- Adjusting after only 1 shot: If you’re set up at 100 or 200 yds away from the target, making adjustments after only 1 shot is a misstep. Shooting a group of a few sample rounds will give you a better idea of which adjustments to make.
- Forgetting to zero your scope: If the option is available on your model, slipping the scales ensures that it’s easy to get back to zero if you make an adjustment in the future. Simply align the “0” on the turret with the indicator mark on your scope.
- Leaving dials exposed: Many scopes come equipped with protective caps to cover the dials. After adjusting your scope, make sure to replace the caps to avoid accidental modifications.
Expert Tip:
If this is your first time sighting a rifle, you may want to partner with a seasoned gun owner or an instructor. They can share some of the best tips and insights they’ve gained from past experiences.
Sighting a Rifle FAQ
Q. Bore Sighting vs. Zeroing
A. The goal of bore sighting is to align the barrel with your riflescope. But this doesn’t mean your projectile will hit the bull’s-eye – bore sighting will just help get you somewhere on the target. Zeroing is a series of precise adjustments (windage/elevation) that help ensure the bullet reaches your desired point of impact.
Q. How far should my eyes be from the scope?
A. This is the distance from the end of the scope to your eye that’s required to see the full picture. The industry standard recommendation is approximately 3.5 inches – this is a good starting point at lower power. You can adjust it to about 2.5 inches as you reach max magnification.
Q. What does “field of view” mean?
A. Field of view lets you know how far you can see from edge to edge in the scope. This value is given in feet or meters at 100 yards and directly correlates to eye relief. Increasing eye-relief distance shortens the field of view.
Keep in mind that greater distances mean less light transmission. However, an eye-relief range of 3.5 - 4.5 inches shouldn’t affect performance.
Q. Do you close one eye when looking through a riflescope?
A. Aiming only with the dominant eye helps block out distractions and makes it easier to focus on the target using a sight or scope. And while this may work in certain situations, it limits the view of your surroundings.
Keep in mind that greater distances mean less light transmission. However, an eye-relief range of 3.5 - 4.5 inches shouldn’t affect performance. Shooting with both eyes open is often recommended for hunters, allowing them to scan the field for additional game while aiming for the animal right in front of them.
It’s also a safer practice, especially in unfamiliar terrain. With both eyes open, you can avoid disorienting yourself between shots.
Q. Are there different types of scopes?
A. Yes, there are several different types of scopes. The one you choose should suit your firearm, environment, and shooting preferences. Common types include:
- Fixed scope (non-adjustable magnification)
- Variable scope (adjustable magnification)
- Night-vision scope (helps you aim in low-light and dark settings)
- Hunting scope (with durability and weather-resistance features)
- Red-dot scope (a highlighted target area aids in accuracy)
Conclusion
Learning how to effectively use your firearm’s scope or sight can be one of the best things you can do to develop your marksmanship in the wilderness or at the shooting range. Remember that practice makes perfect. Once you get the hang of it, sighting in each time you pick up your firearm can feel like a quick and easy task.
Find all the shooting and hunting essentials you need at Academy.com.