 myAcademy® Rewards Credit Card
How To Mount a Scope On a Rifle With Ease
Anatomy of a Hunting Rifle
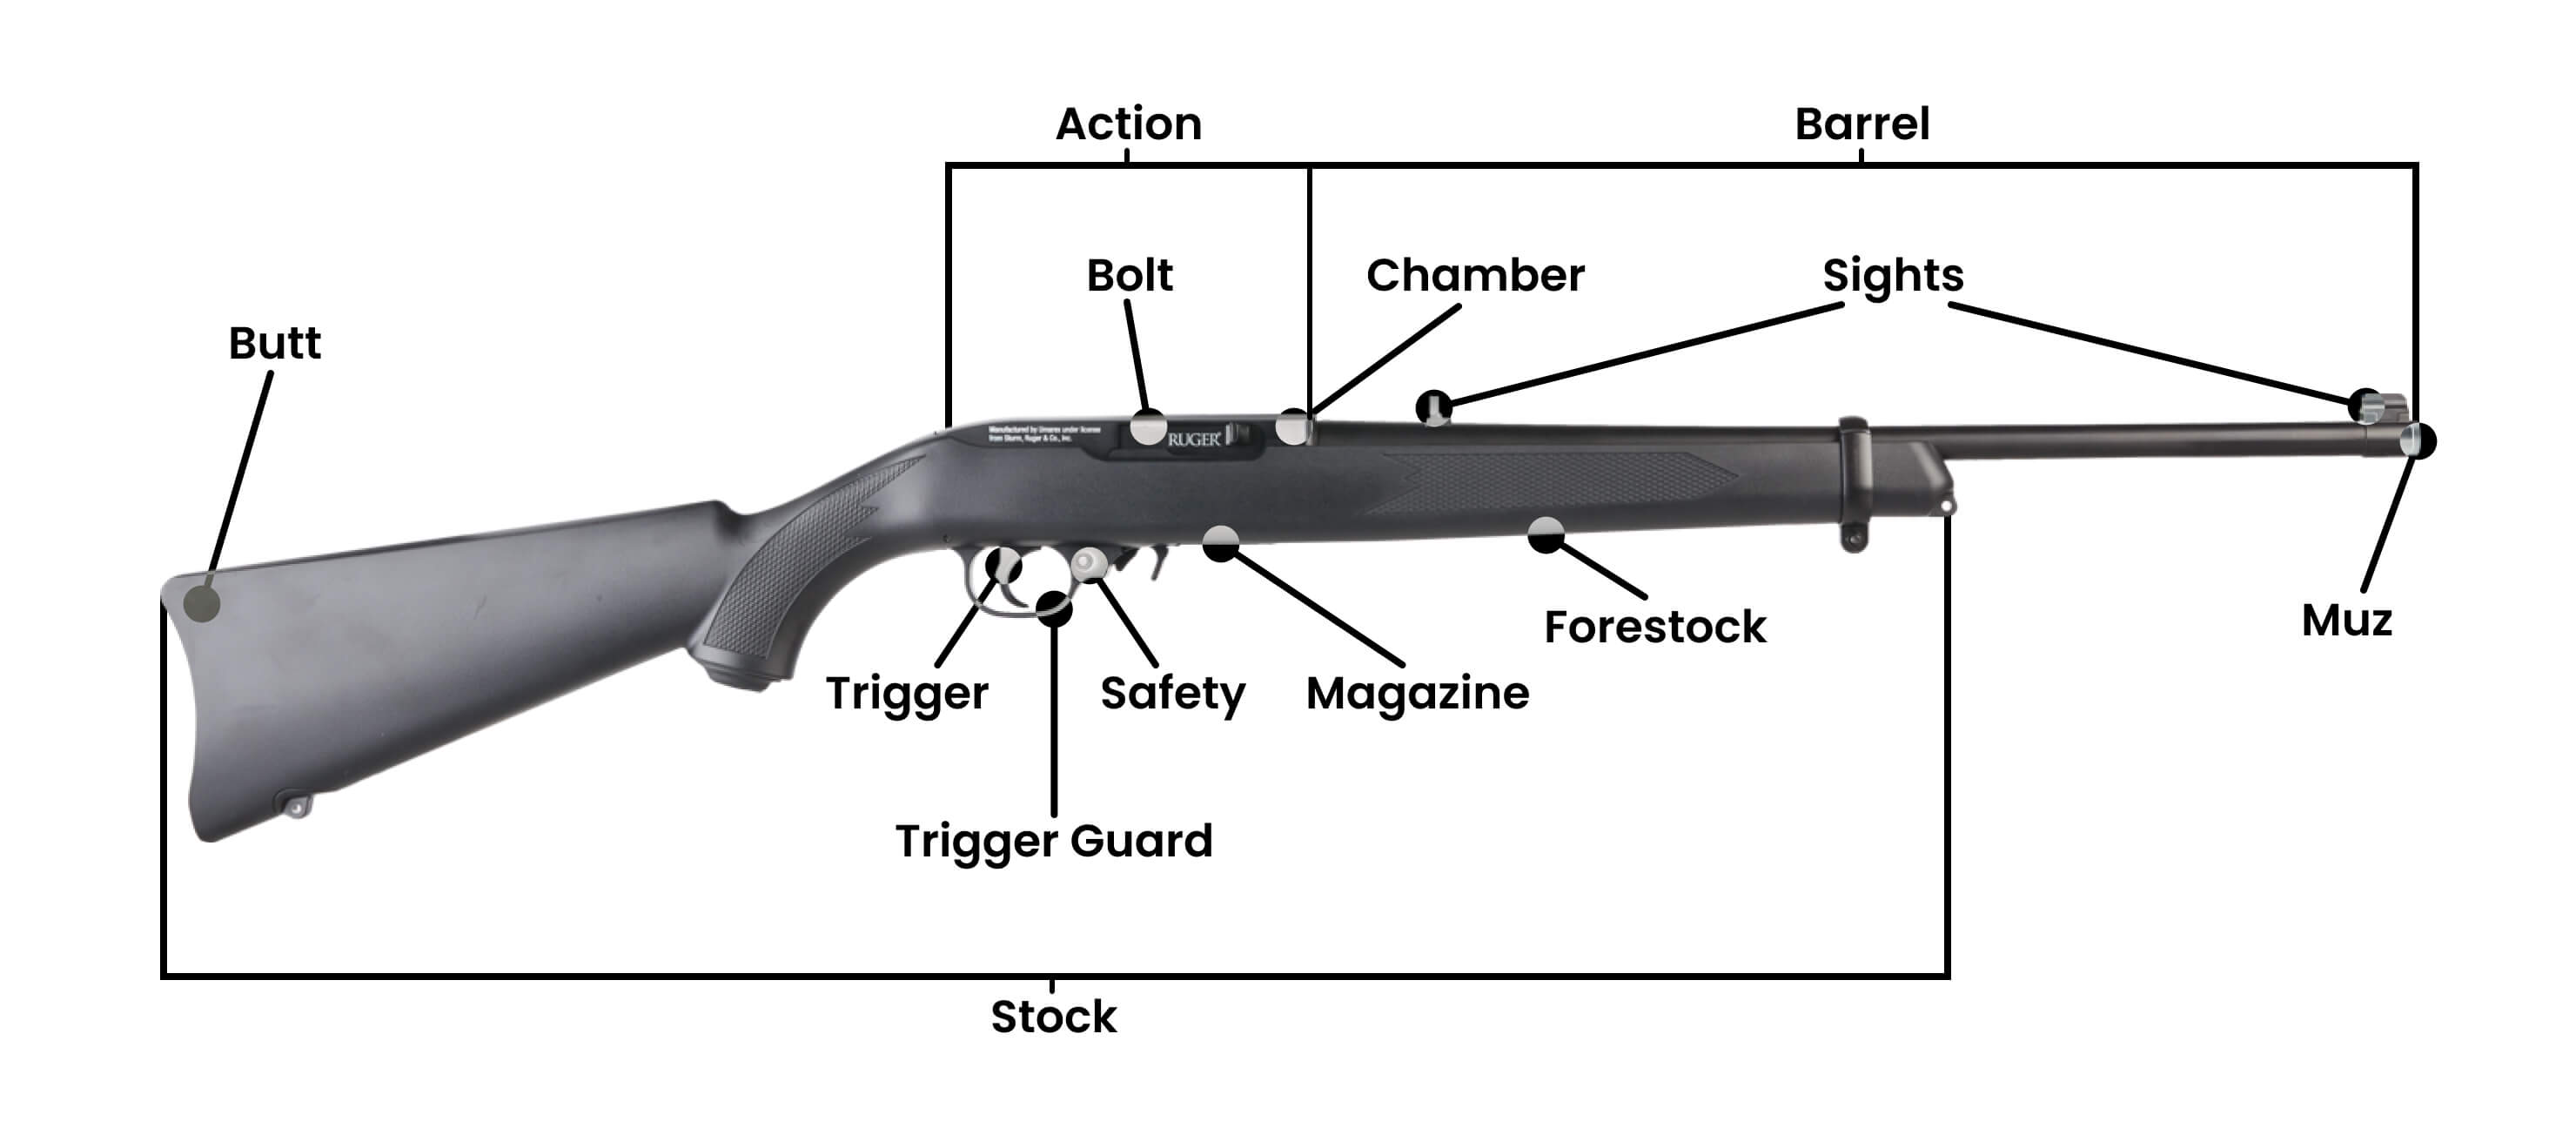
- Stock: Where the shooter braces/holds against their body
- Action: Where shooters load and fire cartridges as well as where they are ejected
- Barrel: The metal tube through which shots fire
- Butt: The part of the rifle also known as a stock that rests against a shooter’s shoulder
- Safety: Device that prevents the rifle from an accidental fire
- Trigger: Where the shooter squeezes to fire the rifle
- Trigger guard: Protects the trigger from accidental fires
- Bolt: A moving block that can seal in cartridges within the chamber
- Magazine: Contains ammunition before it loads into the chamber
- Chamber: Holds the next ammunition ready for firing
- Forestock: Where shooters grasp the rifle with their non-trigger hand
- Sights: Aids in aiming the rifle before shooting
- Muzzle: Where shots fire at the end of the barrel
Mounting a Scope On Your Rifle
If the idea of mounting a rifle scope intimidates you, know that it’s actually easier than it might initially seem. As discussed above, there are significant advantages for those who mount their own rifle scope. So let’s get into how to mount a rifle scope! Following is a step-by-step breakdown of how to successfully mount a scope easily to nearly any hunting rifle on the market.
Step 0: Safety First: Check To See If Your Rifle Is Unloaded
Anytime you handle a firearm, always check to see if the gun is unloaded. The result of an accidental fire is simply not worth the risk. Learn more about gun safety tips.
Step 1: Gather the Right Supplies & Prepare Your Workspace
To accurately affix your scope, you need the right tools as well as a workspace specifically prepared to tackle this task. In general, every gun owner can benefit by having a designated screwdriver set specially designed for gunsmithing. Beyond that, here is an overview of what you’ll need to have on hand before beginning this process:
| Featured Rifle Scope Mounting Supplies | |
|---|---|
| Example | Description |
|
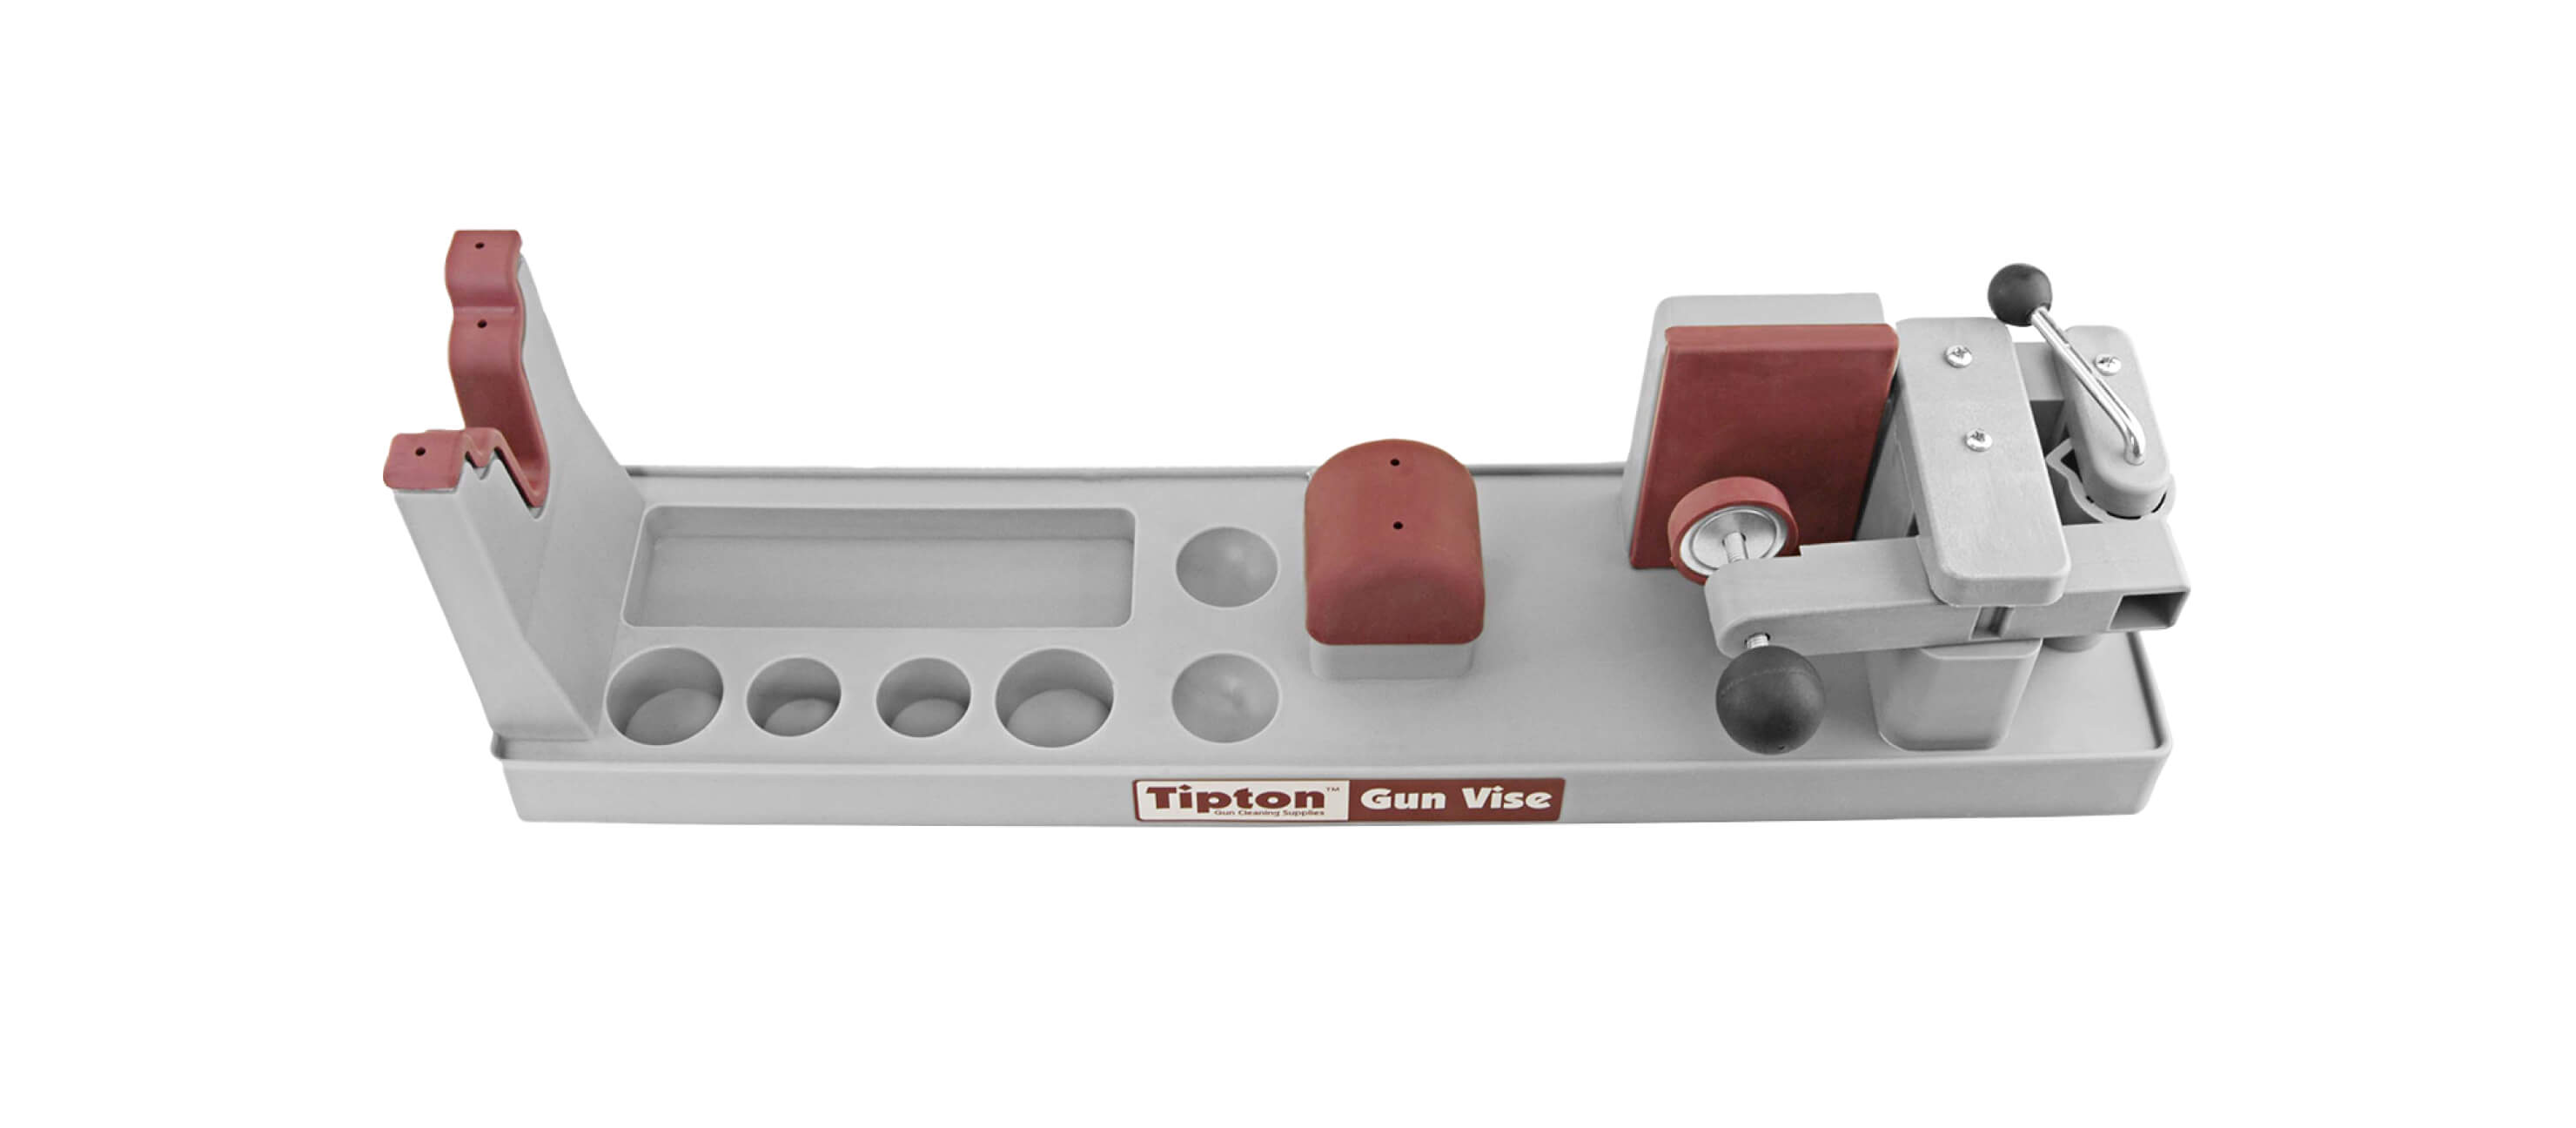
Gun Vice Featured Product: Tipton® Gun Vise
|
|
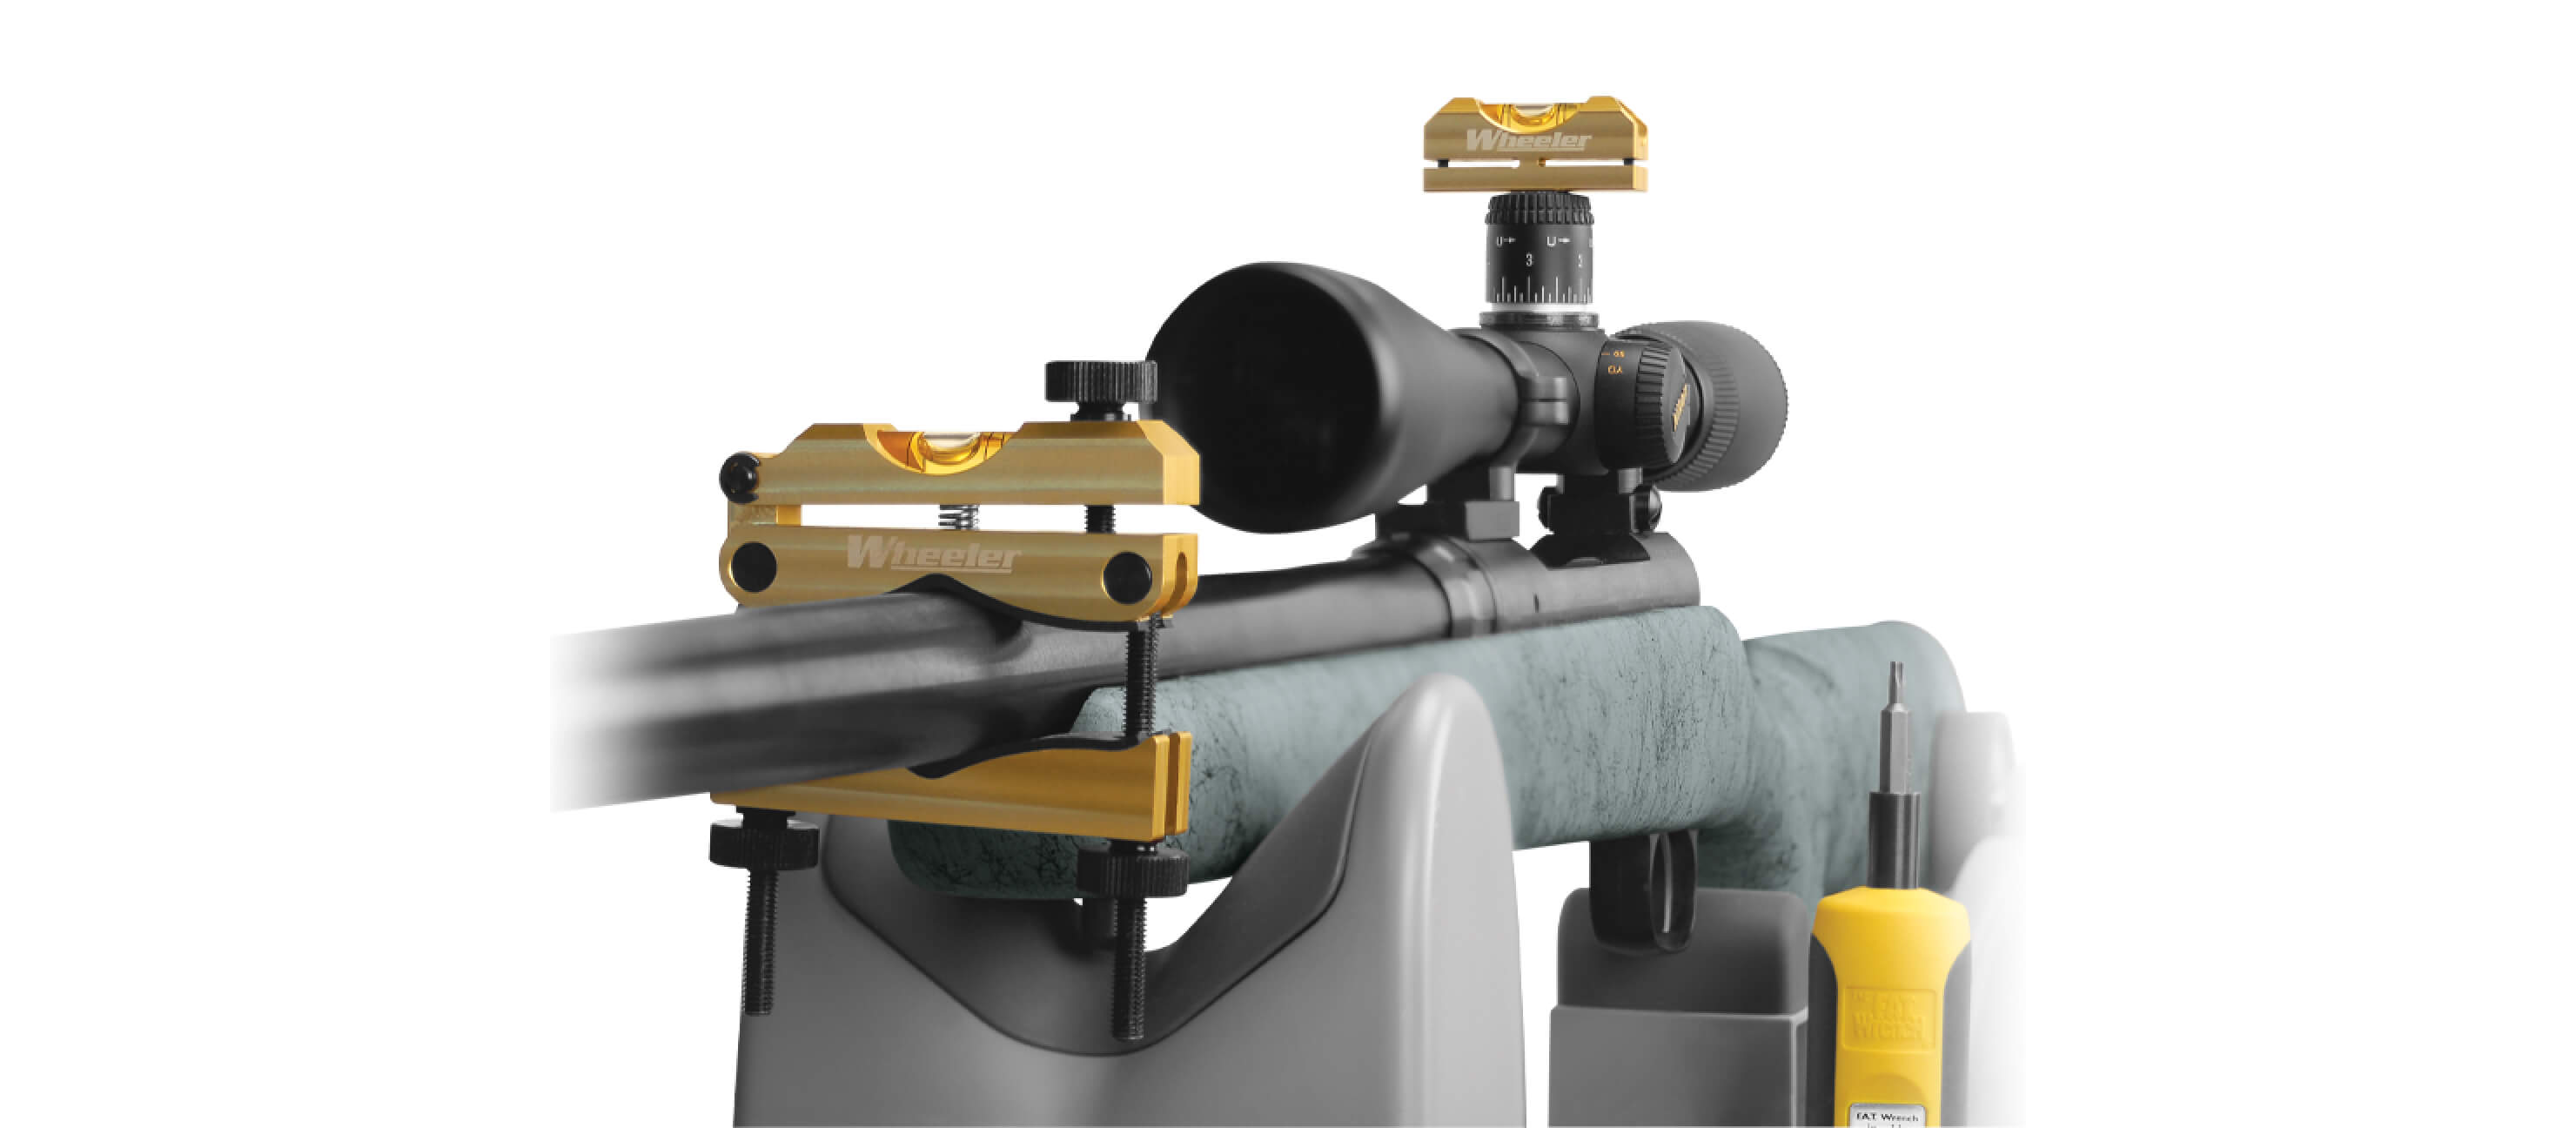
Reticle Leveling System Featured Product: Wheeler® Engineering Professional Reticle Leveling System
|
|
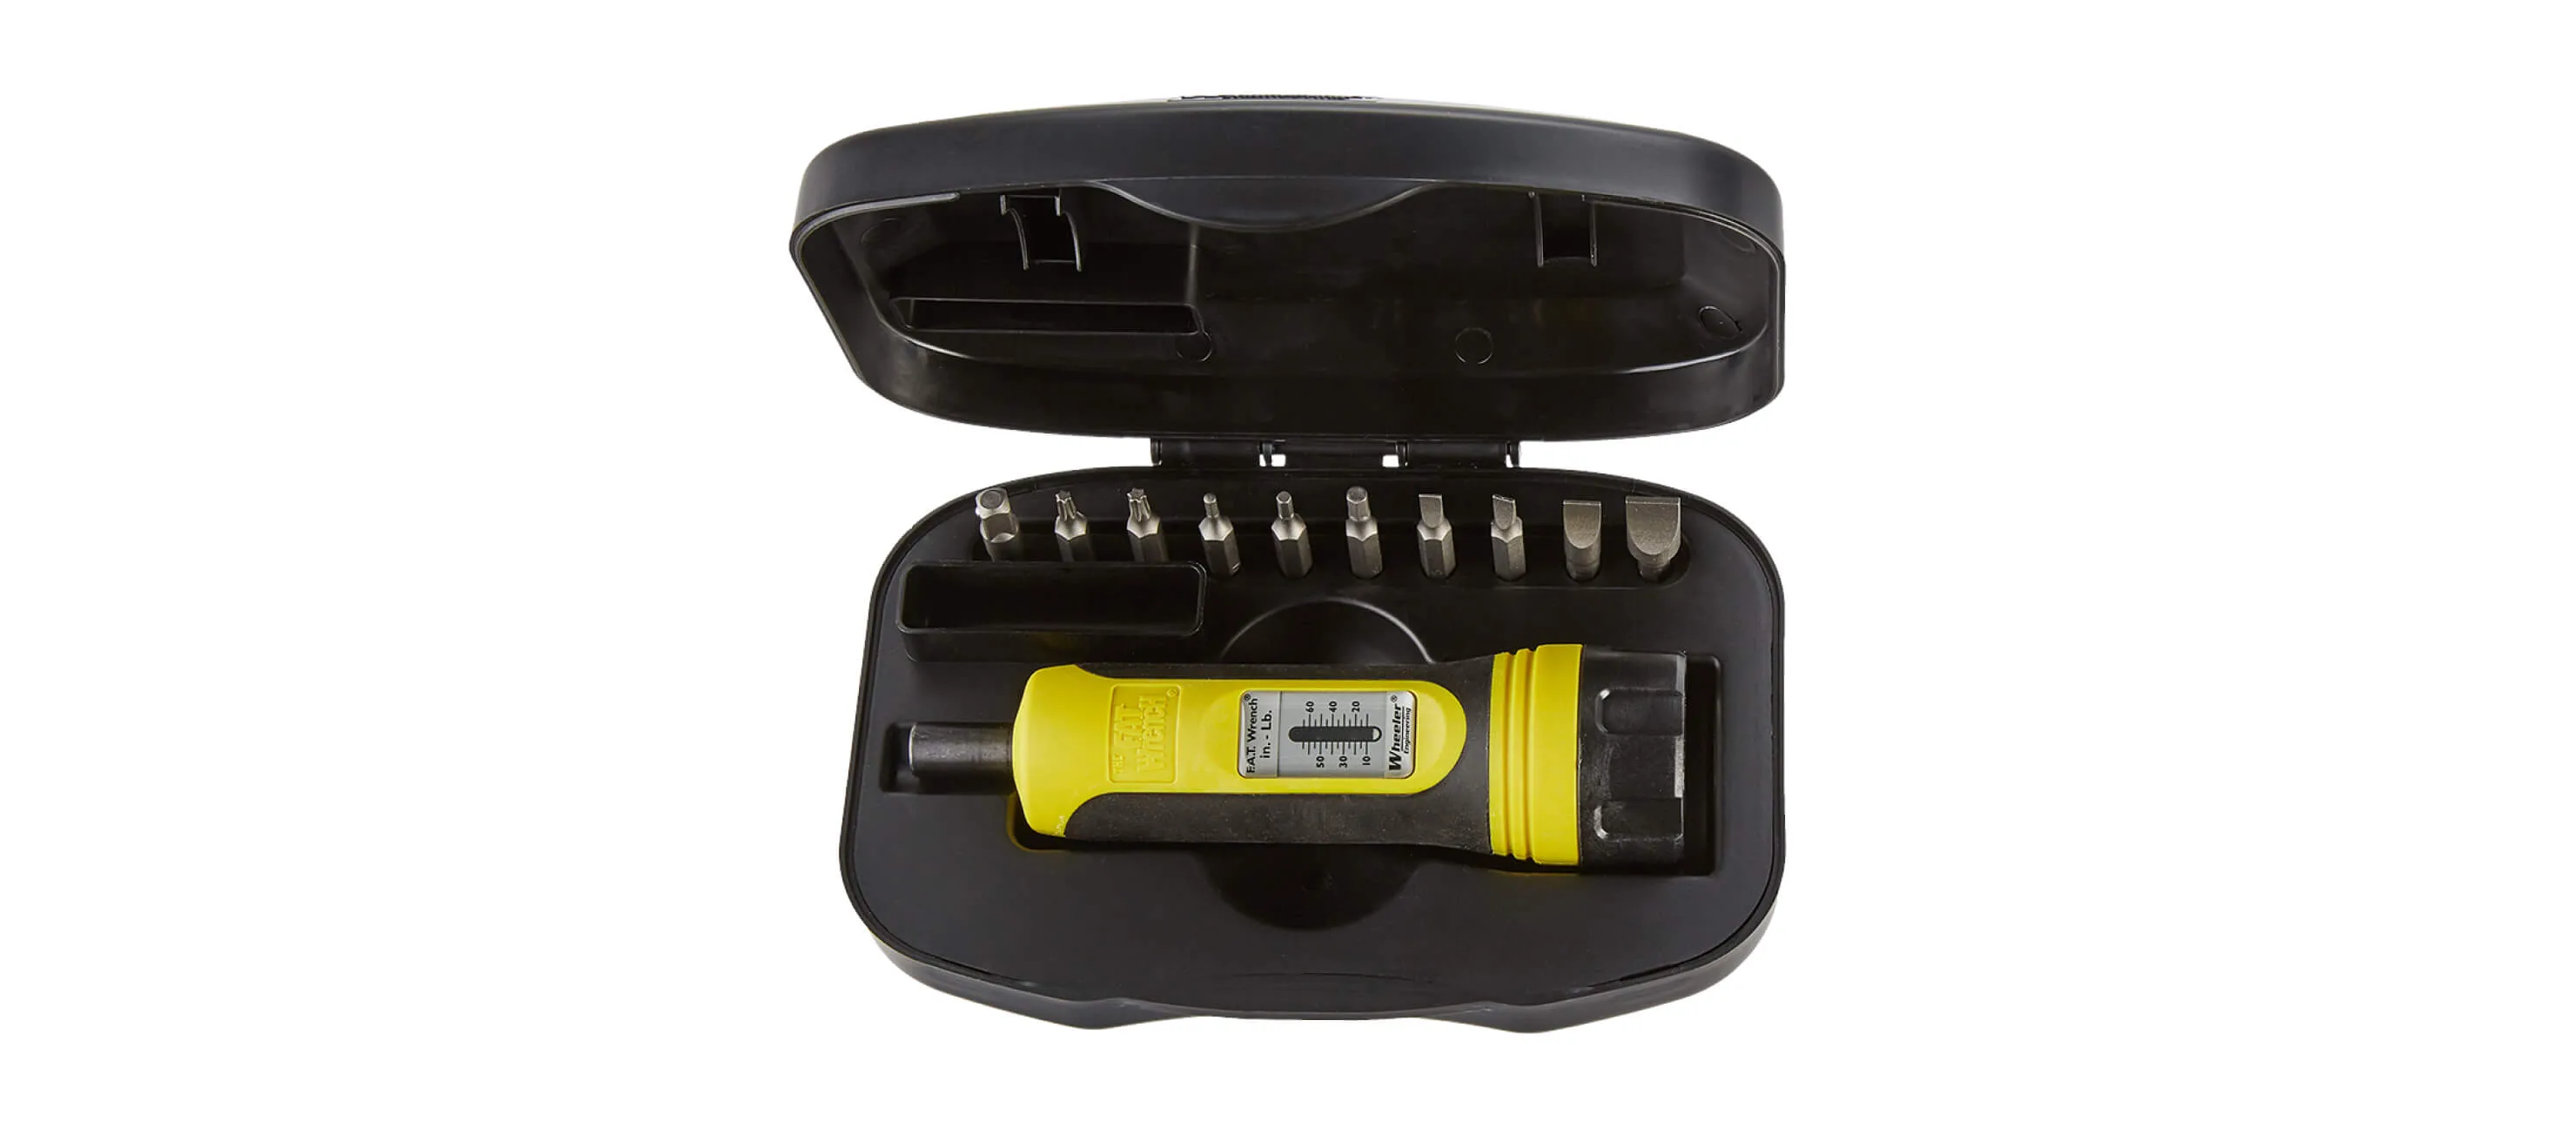
Torque Wrench Featured Product: Wheeler Engineering FAT Wrench with 10 Bit Set
|

|
Gun Oil Featured Product: Remington Rem Oil
|
Step 2: Choose the Right Scope Mount Hardware
There are primarily two common ways to mount a scope to your rifle: using only scope rings or attaching the scope rings to a rail. Each setup has distinct advantages and disadvantages; however, both are great ways to mount a scope on your rifle.
- Scope rings only: Using scope rings is the lightest mounting option. However, if this is the first time mounting a scope to a rifle, they’re not the easier method to set up. Using scope mounts without a rail is perfect for anyone heading out on a backpack hunt where weight matters most.
- Scope rings with a rail: Using scope rings with a rail comes with its own considerations. Although they do add a few more ounces to the overall weight of your rifle, they’re a favorite among long-range or tactical shooters. Your scope rail mounts on a single plane — reducing the likelihood of a wayward angle. Another perk to using a rail to mount your scope is flexibility! You’ll have more options to choose from when deciding where you want to mount the scope to your rifle.
Step 3: Stabilize Your Rifle
Using a gun vice, situate your rifle until it’s stabilized. This step is crucial to achieving the best results when mounting a scope to your rifle. Ensure that your workspace or tabletop is sturdy. If you’re looking to maximize your and/or your rifle’s shooting accuracy, you’ll need a reliable surface that doesn’t shift or wobble around while you work.
Step 4: Mount the Bases On the Rifle
The mounting process looks a little different depending on which setup you chose for your scope. However, the initial setup for both is generally the same:
- Step 1: Before mounting the scope onto the rifle, apply a small coat of gun oil to the underside of both the scope rings or rail. The mounting screws should not be coated in oil, so set them to the side when applying the oil.
- Step 2: Apply another thin layer of oil coating the rifle action. Then place the oiled scope rings or rail onto the rifle.
- Step 3: Using your torque wrench, grab the screws and tighten them into the rifle without torquing them. Once they’re situated, torque them according to the suggested weight to match the manufacturer’s specified fit.

Step 5: Properly Level the Scope
The goal when mounting a scope to your rifle is to match it with the rifle’s action to the identical horizontal plane. Any variation in degrees can significantly (and adversely) affect the aim accuracy of your gun. Thankfully, this simplified mounting method using a professional reticle leveling system (when followed properly) eliminates that possibility.
- Step 1: Mount the barrel leveling clamp to the rifle’s barrel. We’ll index the level a little later, so just focus on affixing the level onto the barrel for now.
- Step 2: Place the second leveler on the rifle action: either atop the front scope ring or directly between both rings on the actual rail. Remember, this second leveler has to perfectly stand perpendicular to the action.
- Step 3: Move (left or right) the rifle until the bubble in the leveler NOT mounted on the barrel is perfectly centered. The bubble is sensitive to your movements, so you shouldn’t have to move the rifle around that much to achieve this.
- Step 4: Loosen the barrel-mounted leveler (careful not to bump the rifle) and adjust the barrel clamp if it’s not at the right angle.
- Step 5: Match the bubbles in both the barrel-mounted level as well as the second level perpendicular to the rifle’s action. Take your time with this step. Patience rewards you with the best scope accuracy.
- Step 6: Now that the barrel leveler is indexed to the perfect plane for the scope mount, remove the leveler from your scope ring or rail. Again, take extra care to not bump your rifle.
Step 6: Set the Scope In the Base Rings
Carefully set the scope in both of the base rings. With the scope situated in the two rings, it should smoothly slide back and forth. You’ll then want to place the top rings over the scope. When you’re fastening them, leave a little bit of wiggle room. This is important for the next step!
Step 7: Position the Scope On the Rifle For Optimal Eye Relief
The next step is to position the scope (moving it back and forth) to give you the best eye relief. Since your scope is indexed to the barrel leveler, you can now take the rifle off of the gun vice. With your cheek to your rifle’s butt, hold the rifle and aim it in a safe direction.
Close both eyes, and open them, looking directly into the scope. The scope will likely be too close or too far away from your eye. So you’ll want to then pull it back or push it forward to a comfortable position.
Everyone will have a different position preference. The important thing to keep in mind is that you want enough room to protect your eye and face from your rifle’s recoil when shooting. If you’re not confident about where yours should be, push it an inch more forward than you think it should be oriented on your rifle.
Step 8: Rotate Scope To Match Levels
Place the rifle back in the gun vice. Next, you’ll want to check the levels once more. Place the second leveler on the scope turret cap (situated perpendicular to the rifle’s action) usually at the center of the scope. Match the bubbles of both levelers by adjusting the rifle in the gun vice.
Step 9: Secure the Scope By Tightening the Screws
Tighten the top screws of the rings to hold the position of the scope. The leveler on the scope may slightly skew, so as you secure the scope, watch the bubbles and ensure they still match. When tightening the screws, only torque with the scope manufacturer’s recommended setting to avoid damaging it.
Next Steps
You did it! Now it’s time to test out your handiwork by taking the rifle to a gun range to confirm the accuracy of your scope. When you’re ready, remove both levelers from the rifle. Take the rifle as if you were shooting it again. Most scopes come with an adjustable reticle focus.
Play around with yours to make sure your sight isn’t blurred.